Soldering is the most frequently used method for attaching components on flex PCBs and conventional PCBs. The fundamental principles of solder components are similar for both conventional and flex PCBs. Nevertheless, due to the distinctive features of flex PCBs, their assembly and soldering are more complex. They require specific conditions than the assembly and soldering techniques used for conventional PCBs.

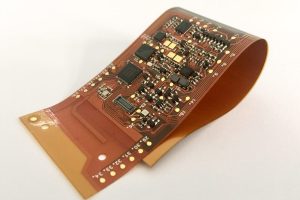
Flex PCB is a unique form of conventional PCBs with unique capabilities. Despite having similar features as conventional PCBs like high density, reliability, and flexibility, flex PCBs offer greater flexibility and higher temperature resistance and can assume a 3-D configuration.
Soldering of flex PCBs requires specific components which must meet certain technical requirements. Technicians who are experts in this process must possess the requisite technical skills as professionals. Although PCB engineers often sometimes make errors when soldering flex PCBs, the consequences of such an error can result in substantial financial costs, in addition to increasing in turnaround time. In this article, the various ways to solder on flex PCBs will be discussed.
Flexible PCB Soldering Step by Step Guidelines
Step1. Use the Right Temperature For Soldering on Flex PCBs
The common rule for soldering on flex PCBs is this: Don’t use the temperature profile for conventional PCBs to solder flex PCBs. This is because the temperature at soldering is done on conventional PCBs can be higher than the right and suitable temperature for flex PCBs. Excessive high temperature during flexible PCB soldering may cause delamination and blistering. It is recommended you consult a reputable manufacturer of flex PCBs in cases where you don’t know the right temperature to use for soldering a flex PCB.
A typical single-edged flex joint needs a soldering temperature of between 330°C and 400°C. In general, using the least temperature to avoid any damage that might be a result of exposure to high temperature and heat is the best.
Step2. Control the Heat Generated During Assembly
A flex printed circuit board is quite thin and so heat control and regulation are important. In every electrical device, too much heat is of great concern. Electrical devices that don’t dissipate heat effectively can cause danger. For instance, it is no news that a cell phone battery can explode as a result of overheating.
A flex printed circuit board is an electrical conductor. As a PCB designer and engineer, you must create a means for heat to be dissipated, otherwise, this can cause damage to the electrical circuitry in flex PCBs.
To ensure a flexible printed circuit board dissipates heat during flexible PCB soldering, ensure you use components with a unique surface-area-to-volume ratio. Use compact designs to minimize the thermal pathway. This method of soldering flex PCB helps to minimize the build-up of heat.
Step3. Avoid Stacking Electrical Conductors on Several Layers of the Flex PCB
During flexible PCB assembly and soldering, manufacturers often place return and signal lines over one another. This is done on adjoining layers to minimize EMI (Electro-Magnetic Interference). This makes the entire flexible circuitry less thin, which creates an effect known as the ‘I-beam effect’. If you will be using the EMI technique during flex PCB soldering, ensure you spread all the pairs of lines to minimize the I-beam effect.
Step4. Remove Residues during Flex PCB Soldering
This method of soldering flex PCB can be challenging. Use a flux pen. The flux helps to clean and etch the oxides on the surface of the flex PCB, improve the solder flow, and avert copper oxidation after heating. It reduces the tension on the welded surface while ensuring that the molten solder spread and penetrate easily.
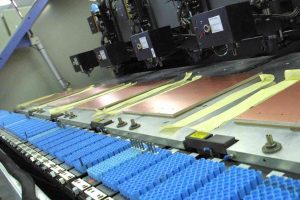
Step5. Solder Paste Printing
Solder paste printing is one of the most critical links in the flexible PCB surface mount process. To obtain the precise amount of solder paste and the alignment of components and pads, we need to use a tool called SMT Stencil.
Related Reading: How To Clean The Solder Paste On SMT Stencil
Step 6. Soldering Capacitors and SMT Resistors on Flex PCB
In soldering SMT capacitors and resistors on flex PCB follow these steps:
- Begin with cleaning the pads of the copper solder with a flux pen
- Dispenser a small solder paste on the resistor or capacitor pads
- Release the resistors or capacitors you need from the reel of the tape.
- Place the resistor or capacitor gently on the copper solder pad
- Tin the tip of the soldering iron and clean the tip using a damp sponge
- Touch the resistor or capacitor and solder pad with the soldering iron tip.
Step7. Avoid Bending of Flex PCB When Soldering
Use either double-back scotch or carpet tape and a transparent film. Laminate the backside of the flex PCB. This helps to reduce stress concentration at the edges of the devices to be mounted on the flex PCB.
Step8. Cleaning Off Residue of Flux
The soldering process in flex PCB involves cleaning off residues from the soldered joint. If you are making use of a no-clean flux, you might not need to be worried about any residue of flux, otherwise, the waste could make the solder joints corrode and cause damage after some time. Do not forget to use electrical tape and place it over the front end of the traces.
Step9. There should be Flexibility for the Stiffeners
Do not forget to remove the adhesive squeezing after the dielectric lamination of the film if you are considering cover films. Otherwise, the process of soldering might become harder.
Generally, the flexible circuits in the flex PCB become evident during etching or copper plating. The exposure of the circuitry can result in dimensional changes. The design of the flexible PCBs and its soldering process requires a significant amount of tolerance for the cover films, as well as stiffeners.
How to Solder Flex Circuit Boards by Hand (DIY)?
Suppose you are an electronic engineer, hardware engineer, or electronic hobbyist, and you want to solder electronic components on the flexible PCB by yourself. In that case, you need to prepare the following tools first:
- Clean and flat table
- Cardboard
- soldering Iron
- Hot plate
- Solder Paste (Sn43Pb43Bi14 or Sn63Pb37)
- No-clean flux pen
- Hot air pencil
- Hot airbath
- Tweezers
- Tape
For more tutorials on manual soldering of flexible PCBs, please click here.
Conclusion
Flex PCBs are known for their flexibility. They can be folded or bent easily into several configurations of your choice. However, the process of soldering flex PCB can be complicated. To correctly and successfully complete the process of soldering a flex PCB, technicians and manufacturers must understand the rules that accompany the design of flex PCBs and how to solder on flex PCBs as discussed in this article.
Related Reading
- The Main PCB Assembly process Steps
- Fast Prototype PCB Assembly Service
- How to Use PCB Stencil-Step by Step Guideline
- 30 Common SMT PCB Assembly Defects
- What is the difference between wave soldering and reflow soldering?
- Flexible Printed Circuit For Today’s Packaging
- Knowledge of Flexible PCB Manufacturing Process Steps
- Knowledge of Plating on Flexible Circuit Board Surface
- Five factors that FPC PCB designers should know about impedance control
- The terms you have to know related to the manufacture of Flexible PCB
- 16 Factors Affecting The Cost And Price of Flexible PCB
- Development and Applications of FPC Flexible PCB
- Complete Introduction of Flexible Circuit Board Materials
- What Is Flexible PCB Coverlay (FPC Cover Layer)?
- The Manufacturing Process Of Double-sided Flexible PCB Coverlay
- Rigid PCB vs Flex PCB: What Is The Difference?
- What Are Flexible PCB Stiffeners?
- What Are The Types of Flexible Circuit Boards?
- Top Applications of Flexible Printed Circuit Boards in 2024
- Flexible PCB Cost: Why It’s More Expensive and How to Reduce It
- Flexible PCB Manufacturing: A Guide to Fabrication and Assembly
- Custom Flex PCB:Tailored Solutions for Your Applications